Master Travel Photography in 3 Months: US Landscapes Course
This beginner’s course outlines how to master travel photography in 3 months, focusing on capturing stunning US landscapes through practical skills, essential gear knowledge, and effective post-processing techniques, ensuring a comprehensive learning experience for aspiring photographers.
Embarking on a journey to master travel photography in 3 months: a beginner’s course for stunning US landscapes might seem ambitious, but with a structured approach and dedicated practice, it’s entirely achievable. This guide will walk you through the essential steps, from understanding your camera to crafting breathtaking images of America’s diverse natural beauty.
Understanding Your Gear: The Foundation of Great Photography
Before you can capture awe-inspiring landscapes, it’s crucial to understand the tools at your disposal. This section will demystify your camera and its basic functions, ensuring you’re not just pointing and shooting, but actively controlling your photographic narrative.
Many beginners often feel overwhelmed by the myriad of settings on a modern camera. However, by focusing on a few core concepts and understanding how they interact, you can gain confidence surprisingly quickly. Think of your camera as an extension of your vision, capable of translating what you see into a captivating image.
Camera Types and Their Advantages
Choosing the right camera can significantly impact your learning curve and final results. While powerful, expensive gear isn’t a prerequisite for great travel photography, understanding your options helps make an informed decision.
- DSLR (Digital Single-Lens Reflex): Offers excellent image quality, interchangeable lenses, and full manual control. Ideal for serious beginners looking to grow.
- Mirrorless Cameras: Lighter and more compact than DSLRs, yet offer similar image quality and lens flexibility. A popular choice for travel due to portability.
- Smartphone Cameras: Convenient and always with you. While limited in manual control, advancements in computational photography make them surprisingly capable for quick snaps.
Beyond the camera body itself, lenses play an equally vital role. A wide-angle lens, typically in the 16-35mm range (full-frame equivalent), is often preferred for landscapes, allowing you to capture expansive vistas. Telephoto lenses, on the other hand, can compress perspective and isolate distant elements, offering a different artistic approach to US landscapes.
Understanding these foundational elements allows you to move beyond automatic settings and begin to experiment, which is where true photographic growth happens. Take the time to read your camera’s manual – it’s a treasure trove of information often overlooked.
Mastering the Exposure Triangle: Aperture, Shutter Speed, ISO
The exposure triangle is the bedrock of photography. Understanding how aperture, shutter speed, and ISO interact is fundamental to controlling the brightness and characteristics of your images. This knowledge moves you from snapping pictures to creating photographs with intention.
Each component of the exposure triangle has a unique effect on your image, and adjusting one often requires compensatory adjustments to the others to maintain proper exposure. It’s a delicate balance that, once mastered, unlocks immense creative control.
Aperture: Controlling Depth of Field
Aperture (measured in f-stops like f/2.8, f/8, f/16) controls the size of the lens opening, thereby regulating both the amount of light reaching the sensor and the depth of field. A wider aperture (smaller f-number) creates a shallow depth of field, blurring the background (ideal for portraits), while a narrower aperture (larger f-number) keeps more of the scene in focus, which is perfect for landscapes.
- Large F-number (e.g., f/11-f/16): Maximizes sharpness from foreground to background, essential for sweeping landscape shots.
- Small F-number (e.g., f/2.8-f/4): Creates a shallow depth of field, useful for isolating subjects or creating a dramatic effect within a landscape if a foreground element is key.
For US landscapes, you’ll generally find yourself using narrower apertures to ensure everything from the distant mountains to the foreground wildflowers is crisp and in focus. This requires more light or longer shutter speeds.
Shutter Speed: Freezing or Blurring Motion
Shutter speed dictates how long the camera’s shutter remains open, controlling the duration light hits the sensor. Fast shutter speeds (e.g., 1/1000s) freeze motion, while slow shutter speeds (e.g., 1/30s or longer) create motion blur, a powerful tool for artistic effects in landscapes.
When photographing rushing waterfalls in a national park or the dynamic flow of clouds over canyons, a slow shutter speed combined with a tripod can transform a static scene into a painterly rendition of movement. Conversely, if you’re capturing wildlife on a dynamic backdrop, a fast shutter speed is crucial.
Remember that slower shutter speeds often necessitate the use of a tripod to avoid camera shake, especially crucial when trying to capture the subtle nuances of light in a dawn or dusk landscape.
ISO determines your camera’s sensitivity to light. A lower ISO (e.g., 100 or 200) produces cleaner images with less noise, ideal for bright conditions. A higher ISO (e.g., 800 or 1600) increases sensitivity, allowing you to shoot in low light but introduces digital noise, which can degrade image quality. For US landscapes, always aim for the lowest possible ISO to achieve maximum clarity and detail.
Compositional Techniques: Framing Your Vision
Once you understand your camera’s mechanics, the next step is to master composition. Composition is the art of arranging elements within your frame to create a compelling and aesthetically pleasing image. It’s how you guide the viewer’s eye and tell a story.
Effective composition elevates a simple snapshot to a work of art. It’s about more than just pointing your camera at a beautiful scene; it’s about intentionally crafting the image to draw the viewer in and convey emotion or grandeur, especially when confronted with the vastness of US landscapes.
The Rule of Thirds and Leading Lines
The rule of thirds is one of the most fundamental compositional guidelines. Imagine dividing your frame into nine equal sections with two horizontal and two vertical lines. Placing key elements along these lines or at their intersections tends to create more dynamic and engaging compositions than centering your subject.
- Rule of Thirds: Avoid placing the horizon line directly in the middle. Position it on the upper or lower third to emphasize either the sky or the foreground.
- Leading Lines: Utilize natural or man-made lines (roads, rivers, fences, mountain ridges) to draw the viewer’s eye into and through the photograph, leading them towards your main subject.
Leading lines are particularly powerful in landscape photography. A winding river in Zion National Park or a dirt road cutting through a vast prairie can effectively pull the observer deeper into the scene, enhancing the sense of depth and scale.
Framing and Symmetry
Natural framing elements like tree branches, arches, or cave entrances can add depth and context to your landscape photos. They act as a window, drawing attention to your main subject while adding visual interest to the edges of the frame. Symmetry, while often contrasted with the rule of thirds, can be incredibly effective when used deliberately, especially when dealing with reflections on water or architectural elements within a natural setting.
Experimentation is key to developing your compositional eye. Don’t be afraid to try different angles, perspectives, and focal lengths. The goal is not just to document a scene but to interpret it in a way that resonates with your personal vision and captivates your audience.
Lighting and Time of Day: The Photographer’s Greatest Allies
Light is arguably the most critical element in photography. Its quality, direction, and intensity can dramatically transform a scene. Understanding how light behaves at different times of day is crucial for capturing stunning US landscapes.
Many beginners make the mistake of shooting at midday, when the sun is harsh and directly overhead, creating strong shadows and washed-out colors. Learning to seek out and utilize “good” light will make a significant difference in the quality of your images.
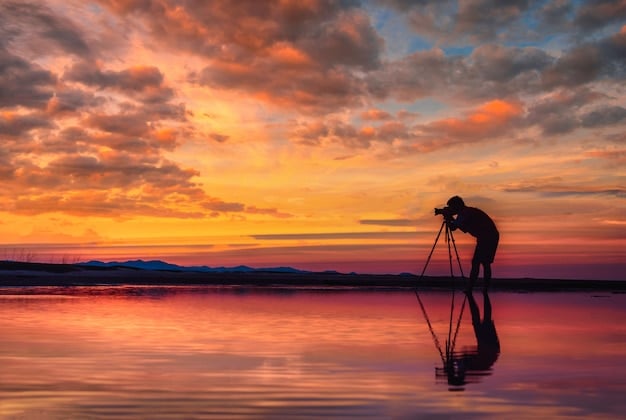
The Golden Hour and Blue Hour
The “golden hour” (shortly after sunrise and before sunset) and the “blue hour” (just before sunrise and after sunset) are revered by landscape photographers. During the golden hour, the sun’s low angle produces a soft, warm, diffused light that enhances colors and creates long, flattering shadows, adding depth and dimension.
- Golden Hour: Warm, soft light that highlights textures and colors; ideal for dynamic skies and flattering subjects.
- Blue Hour: A period of twilight when the sky is illuminated with an intense blue, creating a serene and magical atmosphere, perfect for moodier shots or cityscapes with natural light.
The blue hour, while less about dramatic colors and more about mood, offers a unique opportunity to capture landscapes with a distinct cool tone. It’s particularly effective for capturing silhouettes or for urban landscapes where the artificial lights begin to complement the deep blue sky.
Overcast Days and Harsh Midday Sun
While the golden and blue hours are often preferred, don’t dismiss other lighting conditions. Overcast days offer soft, diffused light, perfect for capturing details and vibrant colors without harsh shadows. This can be ideal for forests or intricate rock formations.
If you find yourself shooting under a harsh midday sun (common when traveling and on a tight schedule), look for opportunities to utilize shadows to create strong graphic shapes or to shoot in shaded areas. Alternatively, consider converting your images to black and white, where the contrast of strong light and shadow can become an asset rather than a detriment.
Learning to “read” the light and predict its behavior is a skill that develops with practice. Before you even lift your camera, take a moment to observe how the light interacts with the landscape, and how it shapes your potential subjects.
Post-Processing Essentials: Enhancing Your Vision
Photography doesn’t end when you press the shutter button. Post-processing is a crucial step that allows you to refine your images, correct imperfections, and bring out the full potential of your captured vision. It’s like developing a raw film, but with far greater control.
Many beginners view post-processing as “cheating,” but it’s an integral part of the digital photography workflow, much like darkroom development was for film photographers. It ensures your final image faithfully represents the scene as you initially envisioned it.
Basic Adjustments: Exposure, Contrast, White Balance
Start with fundamental adjustments in software like Adobe Lightroom or Photoshop (or free alternatives like GIMP or Darktable). These tools allow you to fine-tune aspects that are difficult to perfect in-camera.
- Exposure: Adjust overall brightness. It’s better to slightly underexpose in-camera than overexpose, as recovering blown-out highlights is often impossible.
- Contrast: Adds punch to your images by making darks darker and lights lighter. Use it to create drama or enhance texture.
- White Balance: Corrects color casts so that whites appear white, accurately reflecting the scene’s true colors.
These initial adjustments lay the groundwork for more complex edits. Learning to correctly adjust exposure and contrast alone can dramatically improve the visual impact of your landscape photographs. Understanding white balance also ensures that your photos reflect the true mood and colors of the US landscapes you’ve captured, whether they are desert reds or forest greens.
Color Grading and Sharpening
Once the basics are covered, you can move into more creative adjustments. Color grading involves tweaking hues, saturation, and luminance to evoke a specific mood or enhance the natural palette of your scene. Sharpening can bring out fine details, but use it sparingly to avoid introducing noise or an unnatural appearance.
While subtle improvements are often best, don’t be afraid to experiment to develop your unique style. The goal is to enhance, not to artificially create. The raw files from your camera contain a wealth of data, giving you significant latitude for adjustments.
Always save your original files and work on copies or use non-destructive editing techniques so you can always revert to your starting point. This practice fosters experimentation without the fear of permanently altering your original work.
Storytelling Through Photography: Beyond the Pretty Picture
Great landscape photography goes beyond mere documentation of a beautiful scene; it tells a story, evokes emotion, or captures the essence of a place. Learning to infuse your images with narrative is a powerful step in mastering travel photography.
When you encounter a stunning US landscape, don’t just think “pretty view.” Ask yourself: “What is this scene trying to say?” or “What feeling does it evoke in me?” and then strive to convey that through your lens.
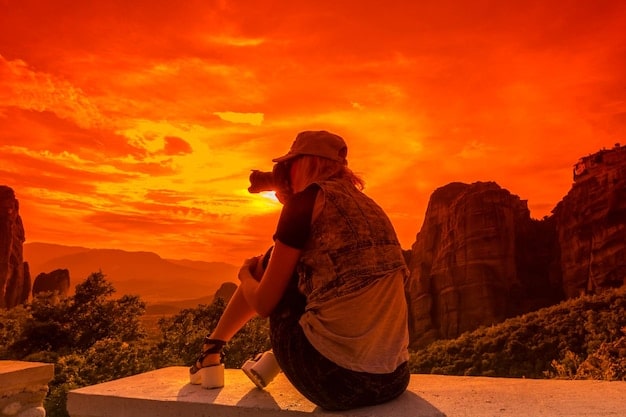
Capturing the Human Element (or its Absence)
While traditional landscape photography often focuses solely on nature, incorporating a human element (even if just a small figure in the distance) can add scale, perspective, and a sense of wonder. It can connect the viewer to the vastness of the scene, allowing them to imagine themselves within it. Conversely, the deliberate absence of human presence can emphasize solitude and untouched wilderness.
- Inclusion: A lone hiker on a trail, a tiny tent under a starry sky adds a sense of scale and human connection to the grandeur.
- Exclusion: Removing signs of human impact, focusing on pristine nature, highlights the untouched beauty and isolation of remote areas.
Consider the story you want to tell. Is it about adventure and exploration, or about peaceful contemplation? The presence or absence of human elements can significantly shift this narrative, allowing your audience to engage with the landscape on a deeper emotional level.
Environmental Portraits and Details
An “environmental portrait” uses a wider shot to place a subject within their surroundings, telling a broader story. In landscape photography, this might mean capturing a specific tree that epitomizes a forest, or a unique rock formation that defines a desert. Don’t forget the small details – a close-up of a unique desert flower, a pattern in the sand, or the texture of ancient rock can sometimes be as powerful as a sweeping vista, adding richness and depth to your overall photographic narrative.
By blending grand vistas with carefully chosen details, you build a more complete and engaging story of the places you visit. This holistic approach makes your travel photography more impactful and memorable, transforming viewers into virtual travelers alongside you.
Practical Tips for Travel Photography in the US
Traveling across the US offers an unparalleled diversity of landscapes, from the arid deserts of Arizona to the lush forests of the Pacific Northwest. Practical planning and on-the-ground execution are key to maximizing your photographic opportunities.
Beyond the technical aspects of photography, being prepared for the realities of travel can make all the difference. This includes everything from gear protection to understanding local logistics and respecting environmental guidelines.
Planning Your Itinerary and Researching Locations
Before you even pack your bags, extensive research is invaluable. Identify the specific landscapes you want to photograph and investigate the best times of day or year to visit. Look up sunrise/sunset times, moon phases (for astrophotography), and even weather patterns typical for your travel dates.
- Location Research: Use online resources, photography blogs, and social media to find iconic spots and hidden gems. Pay attention to photos taken at different times of day to understand light potential.
- Route Planning: Map out your travel route to optimize for daylight hours, allowing enough time at each location without feeling rushed. Consider travel time between sites.
Reading up on national park regulations is also vital; some areas might require permits for photography or have restrictions on drone usage. Being well-informed allows you to focus on your craft rather than facing unexpected hurdles. Having backup locations or alternative plans for bad weather is also a smart strategy.
Packing Smart and Protecting Your Gear
Travel photography means carrying your equipment, often over challenging terrain. Invest in a comfortable, sturdy camera bag that can protect your gear from bumps, dust, and moisture. Only bring what you need; unnecessary weight can be a hindrance.
Consider essential accessories like a sturdy tripod (non-negotiable for landscapes, especially at golden/blue hour), extra batteries, plenty of memory cards, and lens cleaning supplies. A rain cover for your camera and personal protective gear (hat, sunscreen, appropriate footwear) are also crucial, particularly when exploring diverse US climates.
Always keep your most valuable gear (camera body, main lenses) in your carry-on luggage when flying. This minimizes the risk of damage or loss, ensuring your photographic tools are safe and sound for your journey across stunning US landscapes.
| ✅ Key Learning | 💡 Brief Description |
|---|---|
| 📷 Gear Mastery | Understand your camera, lenses, and essential accessories for optimum performance in landscapes. |
| ☀️ Light & Composition | Utilize golden/blue hour and apply compositional rules like the rule of thirds for impactful shots. |
| 🎨 Post-Processing | Learn to refine images with basic adjustments and color grading to enhance your vision. |
| 🗺️ Travel Planning | Research locations, plan itineraries, and pack smart for US landscape expeditions. |
Frequently Asked Questions About Travel Photography
While all settings are important, aperture is often considered the most critical for landscapes. A narrow aperture (high f-number like f/11 or f/16) ensures a large depth of field, keeping both foreground and background elements sharp, which is essential for expansive scenic shots. Proper focus and a sturdy tripod are also fundamental.
Not necessarily. While professional cameras offer more control and higher image quality, a good eye for composition, understanding light, and basic post-processing skills can produce impressive results even with a modern smartphone or entry-level camera. The photographer’s vision often matters more than the gear’s price tag.
Post-processing is extremely important. It allows you to correct minor exposure issues, enhance colors, balance shadows and highlights, and fine-tune sharpness. It’s an integral part of the creative process, bringing your images to their full potential and ensuring they match your initial vision. It’s akin to developing film in a darkroom.
The “golden hour” (shortly after sunrise and before sunset) and the “blue hour” (just before sunrise and after sunset) are generally considered the best times. During these periods, the sun’s low angle provides soft, warm, and diffused light that enhances colors and creates dramatic shadows, adding depth and visual interest to your landscapes.
For a beginner, essential gear includes a camera with manual controls (DSLR or mirrorless), a versatile zoom lens (e.g., 24-70mm or 18-55mm kit lens), a sturdy tripod, extra batteries, and sufficient memory cards. A comfortable camera bag and lens cleaning kit are also highly recommended for travel. Filters can be added later.
Conclusion
Embarking on the journey to master travel photography in 3 months: a beginner’s course for stunning US landscapes is an exciting and rewarding endeavor. By systematically focusing on gear comprehension, the exposure triangle, compositional techniques, understanding light, and essential post-processing, you can develop a comprehensive skill set. This course emphasizes that remarkable photography isn’t just about expensive equipment, but rather a keen eye, deliberate practice, and a deep appreciation for the natural beauty of the USA. The landscapes await your unique interpretation; embrace the learning process, and soon you’ll be capturing images that truly tell a story and leave a lasting impression.


